6.5. Setting up Remote Access
The goal of this section is to guide the reader through how to configure their EnGarde Secure Linux machine for remote access via Secure Shell (SSH). Most day-to-day system administration tasks may be done via the Guardian Digital WebTool but, every so often, you need to do something from the command-line.
By the end of this section the reader will have:
Configured their EnGarde Secure Linux machine to accept incoming SSH connections from their PC.
Properly configured the PuTTY SSH client with an SSH key.
Successfully logged into their EnGarde Secure Linux machine via SSH.
6.5.1. Create a Local User
Before you can remotely log into your machine you need to create an account to login with. Using the procedure outlined in the previous section "Creating a Local User," create yourself an account.
6.5.2. System Access Control
Next you must permit access to the SSH service from your IP address or network. Using the procedure outlined in the previous section "System Access Control," permit access to the SSH service from your IP address or network.
6.5.3. Guardian Digital Secure User Manager
Next you must log into the Guardian Digital Secure User Manager to generate and download an SSH key. For simplicity this section will not cover uploading an existing SSH key. If you already have an SSH key please refer to the EnGarde Secure Professional User Manual for assistance.
Begin by logging into the Secure User Manager:
https://192.168.10.100:1022/
 | The Guardian Digital WebTool runs on port 1023 and the Guardian Digital Secure User Manager runs on port 1022. Make sure you access port 1022 and not port 1023! |
Log in using the username and password you created at the beginning of this procedure. Once authenticated go down to the Generate a New Keypair section and you will see a ssection like Figure 6-6.
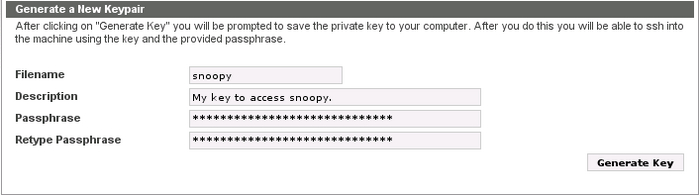
Fill out the information on this page using the suggestions below:
Filename
The base filename for the key files. If your machine's hostname is 'snoopy' you may want to just type that into the box. This field is provided so you may have more then one key configured.
Description
Some comment-like text. Enter something like "My key to access snoopy."
Passphrase
The password used to unlock this key, enter something strong. Your passphrase, unlike a password may contain spaces and other characters. Enter something like "This is my key and there is no other like it!"
After you enter your passphrase you'll have to enter it a second time for verification.
When you're all done click the Generate Key button. Your machine will then generate a key and bring up a screen where you can download it to your PC. Download this file and store it in a safe place.
6.5.4. Logging in With Secure Shell
Before you can SSH into your machine you need to download an SSH client. This section will cover how to use the PuTTY SSH client for Microsoft Windows, available from the following URL:
http://www.chiark.greenend.org.uk/~sgtatham/putty/download.html
Save putty.exe to your PC then launch it. When PuTTY first starts up you will be presented with the PuTTY Configuration dialog shown in Figure 6-7:
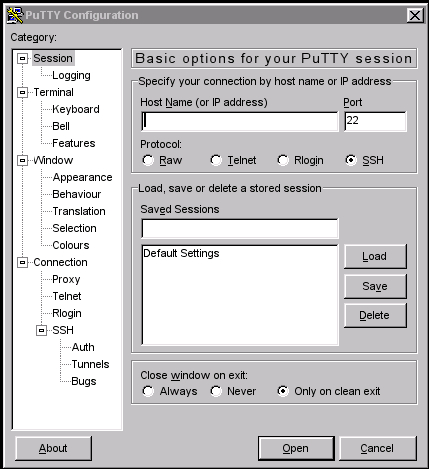
Click on Session in the left Category window. Enter the hostname or IP address of your EnGarde Secure Linux machine in the Host Name (or IP address) box in the right-hand window. Make sure Port is set to 22 and Protocol is set to SSH
Then click on Connection -> SSH -> Auth in the left Category window and you will see a dialog like the one in Figure 6-8. Click on the Browse... button next to the Private key file for authentication box and locate the private key that you generated and downloaded to your PC in the previous section, Guardian Digital Secure User Manager.
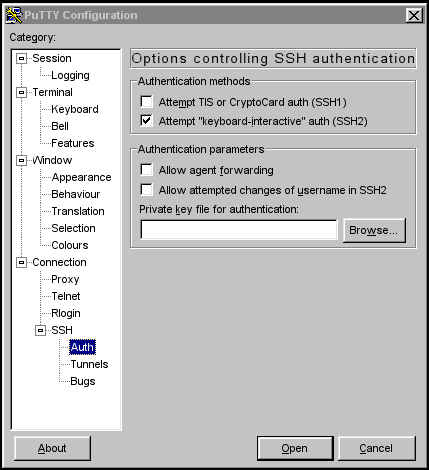
| The keyfile you download from the Secure User Manager has an extension of .key and the default PuTTY filter looks for files with a .ppk extension. Make sure you select All Files (*.*) from the Files of type drop-down menu. |
When you're all done click the Open button at the bottom of the PuTTY Configuration dialog box. You will be prompted to accept your machine's host key (click Ok) then you will be prompted to enter your username and then your key's passphrase.
If you are successful you'll be taken to a shell prompt.
 | PuTTY allows you to save sessions so you don't have to enter your machines hostname and key every time you want to connect. |